Sewing instructions pleated pants Alessia
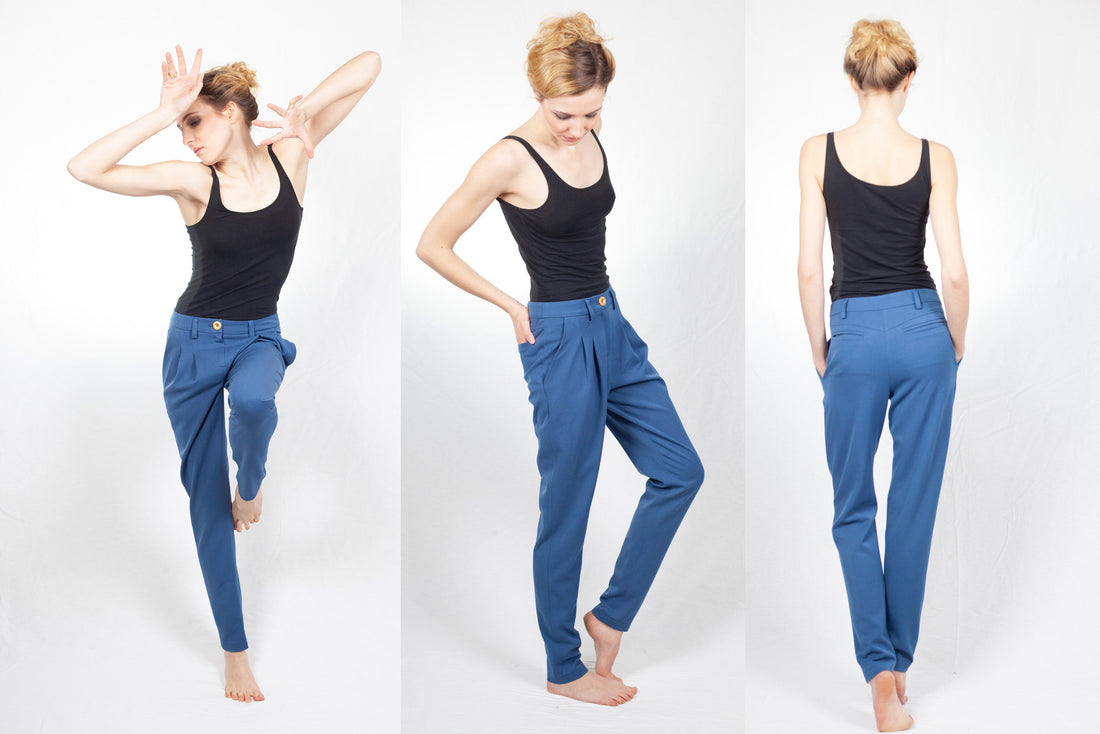
You should have some sewing experience for Alessia, the zip, waistband and pockets pose a few challenges. These pleated trousers have two deep pleats in the front for a casual shape that ends in a very narrow hem. The deep crotch gives Alessia the casual character and is reminiscent of boyfriend pants. Of course, classic pockets shouldn't be missing: slanted pockets at the front, the back welt pockets are processed as fake pockets.
The trousers are ankle-length, 104 cm with the waistband
In these instructions, Alessia was sewn from a fine corduroy fabric.
Required material:
We recommend a heavy, opaque but softly draping fabric, eg a woolen fabric with elastane.
Size 34-44
- Outer fabric 2.00 m (140 cm wide)
- Outer fabric 2.30 m (140 cm wide)
- Lining 0.30 m (140 cm wide)
- Insert 0.65 m (90 cm wide)
- Zipper 1x 14 cm long
- Button 1x 16 mm diameter
In advance for you as information:
cutting:
Cut out the pattern pieces from your outer fabric, lining fabric and interlining . Lay the fabric right side up. The pattern pieces should all be face up. Always align the thread up arrow on all pieces in the same direction and parallel to the selvage of the fabric. Transfer all the notches from the pattern through a 3mm long incision with scissors or chalk . Pinch the seam allowance in the fold of the fabric because this is always a center. Markings define the positions of dart ends , pocket positions, and much more. Transfer these either with chalk or a pin n. It is best to first roughly cut all outer fabric parts that are completely covered with an interlining. After you have fixed the insert, cut it out exactly. There is also a video about gluing and fixing pattern pieces here.
If you want to make your Alessia out of corduroy like in these instructions, then note that corduroy is cut against the grain and the piping with the grain. We have a video for you about this.
If you want to make your Alessia out of checked fabric, then make sure that the pattern pieces of the back piping and the entire waistband are cut diagonally.
In this video, Dagmar shows you the best way to cut checked fabric.

You need from fabric:
- 2x front trousers in opposite directions
- 2x hind trousers in opposite directions
- 2x yoke in reverse
- 2x pocket bags in front large in opposite directions
- 2x pocket receipts for the intervention in opposite directions
- 2x pocket bags at the back in opposite directions
- 1x receipt
- 1x belt loop strip
- 4x piping strips
- 2x waistband on the left in opposite directions
- 2x waistband right opposite
- 2x waistband back piece in opposite directions
- 2x upper and lower flap for the zipper
- 2x pocket facings and back pocket openings
also with band:
- Bund at the top edge
- front pocket on the fly
From lining you need:
- 2x pocket bags at the front in opposite directions
- 2x pocket bags at the back in opposite directions
Sewing instructions:
To sew these pants you need a sewing machine and an overlock sewing machine, alternatively you can use the zigzag stitch on your sewing machine to finish the raw edges. If you use a seam zipper, you also need the right presser foot for your sewing machine. In addition to the description, the colorful lines in the pictures show you where a seam needs to be sewn or something to be glued.
When sewing, pay attention to the seam allowance included in the pattern. Seam allowances that are not specially marked are 1 cm wide!
Happy sewing!

It starts with the receipt of the understep. Lay this wrong sides together and neaten the long and bottom edges together.

On the strip for the belt loops, neaten one of the long sides. Then iron over the raw edge by 1cm and the raw edge by 1cm. Finally, stitch along the long sides, each 0.2 cm wide. Cut the strip into 5 pieces of equal length, each 10 cm long.

Next up is the pocket receipts. Finish these along the long edge.

Stitch the pocket facings all the way around, the width of a stitching foot, onto the lining pocket bags, left sides facing.

Now place the finished pocket pouches with the pocket opening edge right sides together on the pocket opening edge of the front trousers and sew them together.

Then turn the pocket bag inside out and stitch the front edge a stitching foot wide or just under the edge.

Now take the large pocket bag made of outer fabric and place it right sides together on top of the pocket bag. Sew the bags together at the curve and neaten the seam allowances.

It continues with the pleats in the front pants. Place two of the snaps on top of each other and sew them together up to the dot mark.

Iron the contents of the fold towards the center front and topstitch the fold just below the edge.

The back trousers should be taped at the level of the pocket opening (wrong side of the fabric). The piping strips are ironed lengthwise, left sides together, into the fold. I stitched the piping at 0.5 cm with an auxiliary seam. The opening of the piped pockets should be 12 cm long and 1.5 cm wide. It is best to transfer the dot marking of the pattern to the right side of the pants with a chalk line. Draw parallel to this center line 0.7 cm up and 0.7 cm down a delicate auxiliary line (with sublimation chalk), mark the two short ends at right angles so that a "box" is formed.

Lay the piping right sides together with the fold facing outwards, away from the center line. The auxiliary seam of the piping strip is 1mm inside the marked "box", transfer the length of the box to the piping strip and pin. Then sew the piping between the outer needles.

Now sew on the upper piping strip in the same way. To do this, fold the seam allowances of the lower piping strip upwards.

When both pipings are sewn on, cut the middle line in the box up to 1cm before the ends, from there cut 1cm to the corners.

Pull the piping strips completely through this slit to the wrong side of the fabric.

Pull the corner straight onto a piping strip and secure straight onto the piping.

Place the pocket bag made of outer fabric right sides together on the upper piping and stitch the bag onto the seam of the piping.

Place the lining pocket bag right sides together on the lower piping and stitch through the piping seam.

Iron the lining pocket pouch down and stitch it flat on the piping strip, just below the edge.

Secure the pocket pouch at the yoke seam with large stitches (blue line in photo). To do this, flatten the pants and align the piping straight to each other. Pin the whole thing in place and only then sew the pouch in place. Then sew and serge the pocket bag all around.

Lay the yoke on the back trousers, right sides together, and sew and overcast at the dividing seam. Press the seam allowance of the yoke up and topstitch it once, just under the edge and a stitching foot wide from the seam.
For a better understanding of how to sew your zipper and make all the preparations beforehand, we have prepared a video for you here.

Neaten the seat seam allowance of the hind trousers.

It continues with the front trousers parts. Cut off the underlay at the marking in the cut. Cover the top step with fleece up to just above the VM. Next clean up the top and bottom edges...

... and the side and inner leg seams.

Lay the front pants on top of the back pants and sew them together at the side seam. Iron the seam allowance towards the back. I only recommend ironing them apart at the waistband, otherwise the area will be too thick to attach the waistband.

Do the same with the inseam. Iron the seam allowance to the back here and open at the crotch.

The next step is to close the crotch seam. To do this, turn one trouser leg to the right (right side outside) and the other trouser leg (wrong side outside). Tuck the pant leg (right side out) into the other pant leg. Pin the buttocks seam together so that it lies nicely straight and sew them together. Make absolutely sure that the yoke is sewn together at the center back at exactly the same height, and that the inner leg seams are exactly on top of each other.

Now take the zipper and the underlay to hand. Sew the opened zipper onto the underlay. Do not topstitch too close to the ripper bar so that the slider does not get caught later.

Iron the underlap according to Knips and sew the zip with the facing under the left side of the trousers.

Iron the flap over according to Knips, then lay the trousers neatly in front of you so that the flap covers the zip and pin the flap to the zip with a needle. Then fold the sewn-on underlap to the side and sew the zipper through the overlap at 2cm (or 3cm wide) next to the break in the center front. End about 2cm above the zipper end and lock this point.

Fold the underlay back under the zip and (depending on the design) stitch through the top flap, zip and underlap at the corner of the crotch seam in a curve or at an angle to the center front, lock at the crotch seam.

Next up is the covenant. Sew the three waistband parts together at the side seams. Pay attention to the seam allowances in the pattern. Iron the seam allowances apart.

Place the inner and outer waistband together and sew them together at the double-reinforced top edge. Trim the seam allowance and iron the waistband flat.

Now you need the belt loops. Lay them wrong sides together at the markings on the outer waistband and fasten them with approx. 0.5cm.

So you can put the finished waistband right sides together on the trousers.

When sewing on, also close the short ends of the waistband (when sewing, the waistband should be on top, the trousers on the table side).

Turn the waistband right side out and iron it flat again if necessary. Then you stitch on the inner waistband in the shadow of the seam (from the right). Sew over the belt loops that are still open.

Fold in the belt loops 1cm at the top edge, left sides facing and fasten to the top edge of the waistband. Then straighten the belt loops and fasten them under the waistband at the bottom edge. Finally, neaten the trouser hems, fold 3cm inwards and topstitch at 2.5cm. Make the buttonhole according to the pattern in the upper waistband and sew the matching button onto the lower waistband.
Your ALESSIA is ready !
If you don't know what to do, or if you have any questions, please send us an email to info@schnittmuster-berlin.de.
We will answer you as soon as possible.
Have a lot of fun with your new designer piece!
Sincerely, your Dagmar and Ellen.
