Sewing instructions for the Cordoba dress
Level : medium - for experienced
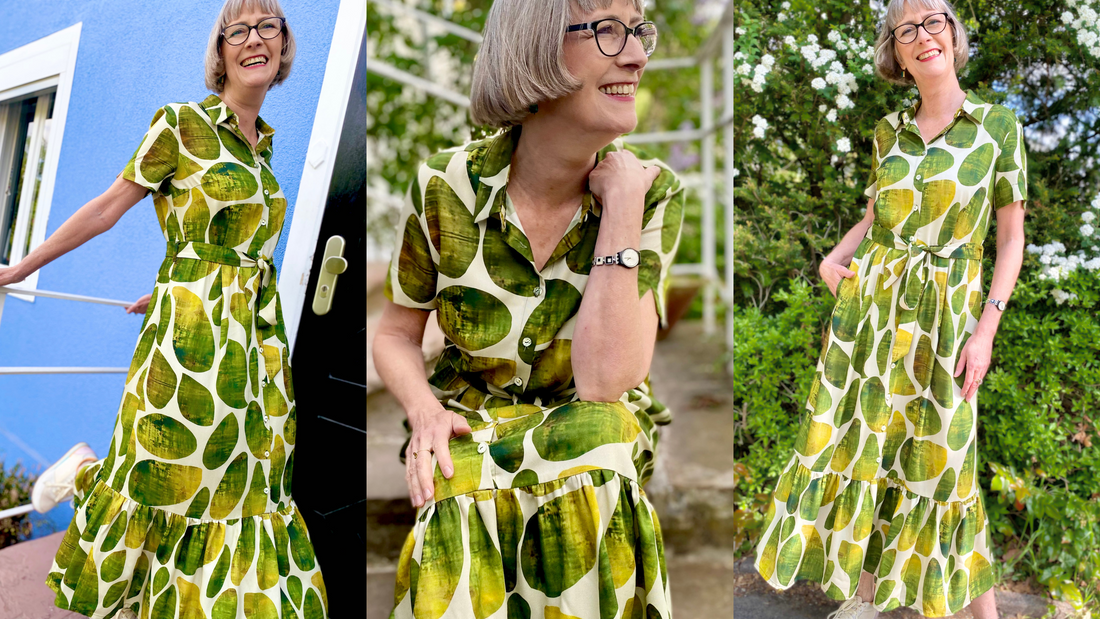
In this tutorial, Cordoba was sewn from a soft draping viscose print.
Required materials:
We recommend viscose, cotton, silk, light denim fabrics
| Sizes 34-42 | Outer fabric | 2.80 m | 140 cm wide |
| insert | 1.10 m | 90 cm wide | |
| buttons | 13 pcs. | 1.2 cm diameter | |
| Sizes 40-50 | Outer fabric | 3.20 m | 140 cm wide |
| insert | 1.10 m | 90 cm wide | |
| buttons | 13 pcs. | 1.2 cm diameter |
Cutting:
Seam allowances are included - 1cm wide or as per marking clips!
Cut out the pattern pieces from your outer fabric and interfacing. Lay the fabric right side up. Place the selvedges parallel to the center so you can place the back piece, collar stand, and undercollar and overcollar on the fold. The pattern pieces should all be laid with the writing facing up. Always align the grain arrow on all pieces in the same direction and parallel to the selvedge of the fabric. Transfer all notches from the pattern by making a 3mm slit with scissors or chalk and mark the ends of the darts. Notch the seam allowance along the fold, as this is always the center. Marks define the positions of dart ends, pocket positions, and much more. Transfer these either with chalk or pins. It's best to roughly cut all outer fabric pieces that will be completely covered with interfacing. After you've secured the interfacing, cut it out precisely. There's also a video here about gluing and securing pattern pieces.

You will need fabric:
- 2x front part opposite
- 1x back part in the fracture
- 1x pass in the fraction
- 2x sleeves opposite
- 4x pocket bags opposite
- 1x belt loops, 2 pieces

- 2x skirt front opposite
- 1x skirt at the back in the fold
- 2x hem ruffles in the fold

also with insert:
- 1x upper collar in the fold
- 1x undercollar in the fold
- 2x bridge in the fracture
- 2x belts opposite
Sewing instructions:
To sew this blouse you will need a sewing machine and an overlock sewing machine, or alternatively the zigzag stitch on your sewing machine to neaten the cut edges.
In addition to the description, the colored lines in the pictures show you where a seam needs to be sewn or something needs to be glued.
When sewing, pay attention to the seam allowance included in the pattern. Seam allowances not specifically marked are 1cm wide!
Have fun sewing!


After turning the collar bar right side out and ironing it flat, sew the collar on by pinning the inner collar bar, right sides together, to the neck hole and stitching it in place.

The seam allowance from the neckline is pressed into the collar stand. The previously pressed outer stand is stitched in place close to the edge.

We come to our all-time favorite task: buttonholes! Attention: buttonholes on the right front piece, buttons on the left front piece. Note: always viewed from your own side.

Before we celebrate the finale, let's take care of the belt and belt loops.
Fold the strip for the belt loops lengthwise, right sides together, and sew it together.
Now take a darning needle (which has a rounded tip), a sturdy, thicker yarn (this minimizes the risk of the thread breaking when pulling it through), and sew the thread at one end.
Now, with the needle head first, push the needle and thread through the "tube" until you have turned the entire strip inside out. Iron the loop flat and cut it in half.

Then you stitch it onto the side seam in the waist area.

Sew the belt together at the center back, right sides together, and press the seam allowance open. Then turn the belt right sides together. Leave a small opening for turning. Carefully trim the ends.

You take a wooden spoon, put the end of a belt over it and push it until you reach the opening.

After ironing, stitch the opening in the belt closed.

If you don't feel like using ruffles anymore, just stitch the hem twice 1cm and your shirt dress is ready.
Otherwise, thread the top edge of the front and back ruffles, close the side seams, neaten the seam allowances, and press them forward. The hem is turned under twice 1 cm and stitched.

You pin the center front of the dress together, then gather the ruffle, pin it all the way around, and sew it on. The seam allowance is neatened and ironed upwards.
Your CORDOBA is ready!
If you're stuck or have any questions, please email us at info@schnittmuster-berlin.de. We'll respond as soon as possible.
Have lots of fun with your new designer piece!