Sewing instructions midi dress Inka
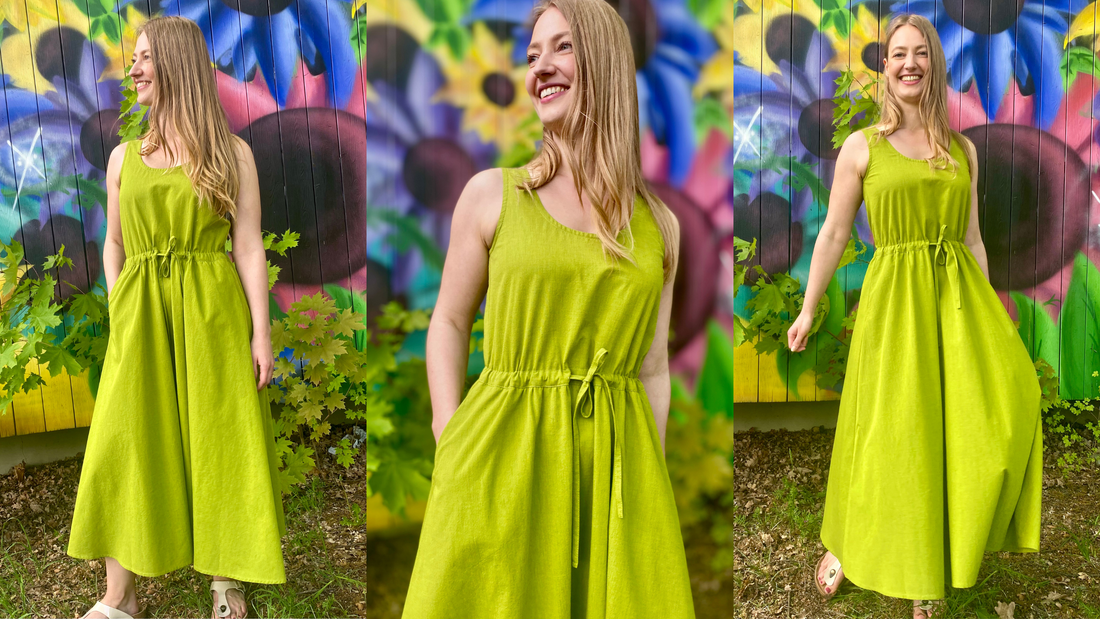
Midi-length summer dresses are very trendy right now. Inka has a round neckline and is sleeveless; the skirt is gathered at the waist with a drawstring. If you prefer a shorter version of Inka, simply adjust the skirt length accordingly. The neckline and armholes are finished with a simple binding, so no facing will show through.
Length at back center = 127 cm
Inka was sewn from a soft, flowing Tencel fabric in this tutorial.
Materials needed:
We recommend a flowing fabric, e.g. viscose, cotton or silk, opaque, as the dress is unlined.
Sizes 34-42
- Outer fabric 3.10 m (140 cm wide)
Sizes 44-50
- Outer fabric 3.30 m (140 cm wide)
Cut:
Seam allowances are included - 1cm wide or as indicated by the marking notches!
Cut out the pattern pieces from your outer fabric and interfacing. Place the fabric right side up. Align the selvedges parallel to the center so you can lay out the front, back, skirt, back casing, and front casing on the fold. All pattern pieces should be laid with the printed side facing up. Always align the grainline arrow in the same direction on all pieces, parallel to the selvedge of the fabric. Transfer all notches from the pattern by making a 3mm snip with scissors or using chalk, and mark the ends of the darts. Note that bust darts are required from size 38 onwards. Snip the seam allowance on the fold, as this is always the center point. Markings define the positions of dart ends, pocket positions, etc. Transfer these either with chalk or pins.


You will need the following fabric:
- 1x front part in breakage
- 1x back piece in half
- 2x Rock im Bruch
- 4x pocket bags, 2x each, mirrored
- 1x tunnel - front, broken
- 1x tunnel - rear in the break
- 2x binding tape
- 2x slanted armhole strap FDL
- 1x slanted neckband FDL

also with insert:
- 2x tunnel front reinforcement of the buttonhole positions
Sewing instructions:
To sew this dress you will need a sewing machine and an overlock sewing machine, or alternatively the zigzag stitch of your sewing machine to finish the cut edges.
The colored lines in the pictures show you, in addition to the description, where to sew a seam or glue something.
When sewing, pay attention to the seam allowance included in the pattern. Seam allowances not specifically marked are 1 cm wide!
Have fun sewing!


You topstitch the neck and armholes of the front and back pieces with a basting stitch the width of a presser foot. This guarantees that the seams will not stretch out, especially with lightweight fabrics.

Now you can place the front and back pieces right sides together and sew the side and shoulder seams. The seam allowances are then finished together and pressed to the back.

Now let's prepare the neck and armhole bands, which are cut on the bias. Fold these in half and press them wrong sides together. Since the fabric stretches slightly when ironed, you'll need to reposition your paper pattern on the bands after ironing and trim it to the correct size.

Next, place all the ribbons right sides together and sew them together in a circle. Press the seam allowances open and then fold the ribbons wrong sides together again, following the fold.

Stitch the neck and armhole bands together with a basting stitch the width of a presser foot. This step prevents the two layers of fabric from slipping.

The now perfectly prepared neck and armhole bands are pinned right sides together and sewn on with a 1cm seam all around.

Here you can see a detailed photo of the neckline and armhole finishing with the respective straps. The seam of the neckline strap is located on my right shoulder.


For extremely fraying and thin fabrics, I recommend trimming the seam allowance separately.

Fold the straps inwards and iron everything before stitching.

Here you can see a detailed photo of the quilted neck and armholes.

The bodice is now prepared, and you can turn your attention to the dress casing. Place both casing pieces right sides together and sew the side seams. Press the seam allowances open.


Then iron the top edge over by 1cm.


The front tunnel will have buttonholes. Use the pattern as a guide. Set the tunnel aside.

Take both skirt pieces, place them right sides together and sew the side seams up to the notch of the pocket opening.
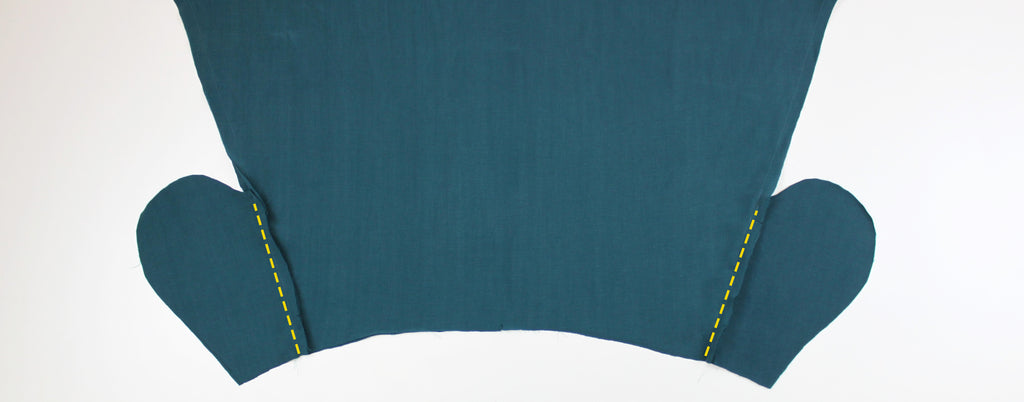
Next, sew both pocket bags of the front and back skirt pieces right sides together, ending at the notch at the level of the side seam.

Here you can see a close-up photo of a sewn-on side seam pocket. If needed, you can topstitch the pocket bag close to the edge.

Both pocket bags are sewn together right sides facing and the seam allowances are finished together.

Finish the side seams together in one go and iron them towards the back.

The hem is folded over twice and stitched close to the edge.

The skirt waist seam is provided with a support seam for the gathers and gathered to the length specified in the pattern.

Now take your prepared top and place it wrong sides together on top of the skirt. The seam will then be facing outwards, but will later be hidden by the casing…

… because the tunnel is then sewn right sides together from the outside to the seam allowance and ironed upwards.

Here you can see another detailed photo of how I sewed on the tunnel.

You topstitch the ironed-up tunnel all the way around along the bottom seam, close to the edge…

…and tacked close to the edge at the top seam.

Finally, all that's left is to attach the ties. Place the ties right sides together and stitch them together. Press the seam allowances open.


The ends of the strips are turned right side to right side and the corners on both sides are cut off.

Fold the seam allowances inwards and over, then stitch the band all the way around.

Your tie is finished. Thread it through the tunnel. Use a safety pin to help you.

Your INKA is finished !
If you get stuck or have any questions, please feel free to contact us by email at info@schnittmuster-berlin.de. We will reply as soon as possible.
Have lots of fun with your new designer piece!
Sincerely, your Schnittmuster-Berlin team.