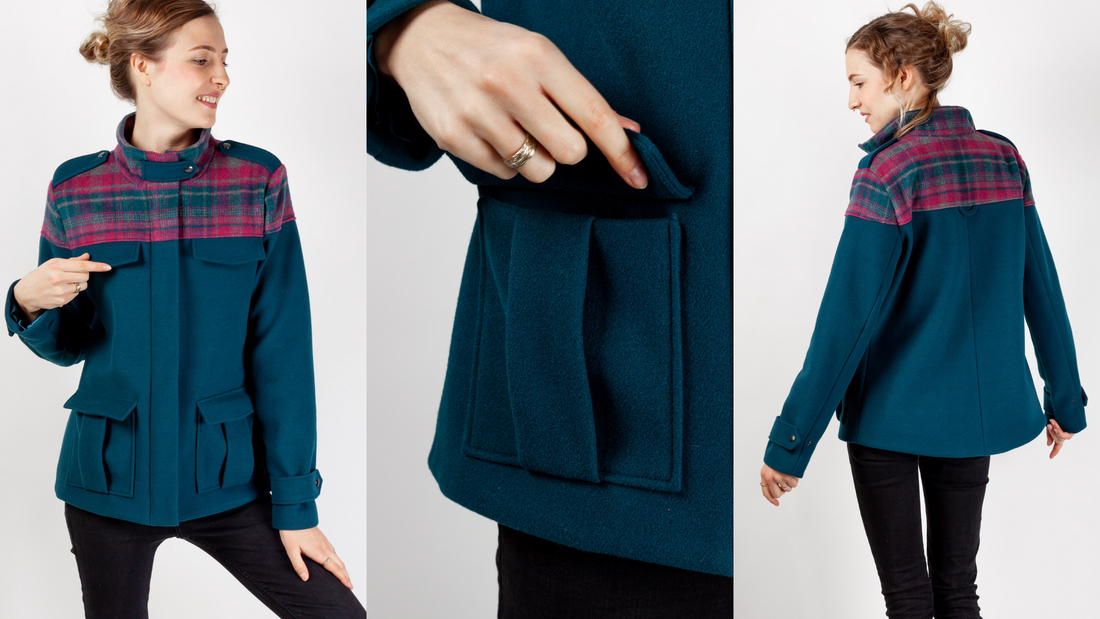
In November 2019, we released the first pattern developed with Manu, the Emilea hoodie . One year later, we're delighted to present its successor: SVEA – a jacket in a sporty military style, with patch pockets, epaulettes, and arm straps. This jacket combines many details, such as the zipper in the center front, which the placket conceals, and the various bartacks that you can attach with sporty printers. Every single one of the small details is well thought out, as we've come to expect from Manu. The various divisions in the pattern and the many details make using a contrasting fabric, such as a wool fabric with oilskin, worthwhile.
In this tutorial, Svea was sewn from a wool/polyamide blend.
Required materials:
We recommend a sturdy cotton or wool fabric.
Sizes 34-40
Outer fabric
1.50 m
140 cm wide
Sizes 34-40
Contrast fabric
0.60 m
140 cm wide
Sizes 34-40
lining fabric
1.20 m
140 cm wide
Sizes 34-40
insert
1.60 m
90 cm wide
Sizes 42-50
Outer fabric
1.90 m
140 cm wide
Sizes 42-50
Contrast fabric
0.60 m
140 cm wide
Sizes 42-50
lining fabric
1.40 m
140 cm wide
Sizes 42-50
insert
1.80 m
90 cm wide
Sizes 34-50
Fixing tape
1.10 m
12 mm wide
Size 34
Ripper
56 cm long
divisible
Sizes 36-38
Ripper
58 cm long
divisible
Size 40
Ripper
60 cm long
divisible
Sizes 42-50
Ripper
65 cm long
divisible
Sizes 34-50
Printer
9 pcs.
10 mm diameter
Sizes 34-40
Outer fabric complete
1.90 m
140 cm wide
Sizes 42-50
Outer fabric complete
2.30 m
140 cm wide
Cutting:
Seam allowances are included - 1cm wide or as per marking clips!
Cut out the pattern pieces from your outer fabric, lining fabric, and interfacing. Lay the fabric right side up. Place the selvedges parallel to the center so you can place the back yoke, back hem facing, and back facing on the fold. The pattern pieces should all be laid with the writing facing up. Always align the grain arrow on all pieces in the same direction and parallel to the selvedge of the fabric. Transfer all notches from the pattern by making a 3mm long slit with scissors or chalk and mark the ends of the darts. Note that bust darts must be used from size 42 onwards. Notch the seam allowance on the fabric fold, as this is always the center. Markings define the positions of dart ends, pocket positions, and much more. Transfer these either with chalk or pins. It is best to first roughly cut out all outer fabric pieces that will be completely covered with interfacing. After securing the interfacing, cut it out precisely. Here's a video from us on how to glue and secure pattern pieces.
Seam allowances are included - 1cm wide or as per marking clips!
You will need fabric:
1x yoke at the back of the fold
2x back bottom opposite
2x upper sleeves opposite
2x upper sleeves opposite each other
2x undersleeves opposite
1x underlay left
2x bag opposite
1x tape
also with insert:
1x front part right
1x yoke front right
2x collar
1x cover top right
1x cover bottom right
1x receipt front right
1x receipt at the back of the break
1x receipt front left
1x front part left
1x yoke front left
2x hem facings opposite each other
1x hem facing at the back of the fold
1x collar bar
2x shoulder straps opposite
2x pocket flap top opposite
2x pocket flap top inside opposite
2x pocket flaps below opposite
2x pocket flap bottom inside opposite
2x pocket receipts opposite
2x arm bars opposite
You will need from food:
2x front lining opposite
2x yoke front lining opposite
2x upper sleeve lining opposite
2x undersleeve lining opposite
1x back lining in the fold
Sewing instructions:
Seam allowances are included - 1cm wide or as per marking clips!
To sew this jacket you will need a sewing machine.
If you're using a zipper, you'll also need the appropriate presser foot for your sewing machine. The colored lines in the images, in addition to the description, show you where to sew a seam or glue something. When sewing, pay attention to the seam allowance included in the pattern. Seam allowances not specifically marked are 1cm wide! Have fun sewing!
Sizes 42-50 have a bust dart; please sew this according to thepattern. A simple, straight dart issewn as follows after precisely transferring the markings. Place notch on notch, draw a linewith tailor's chalk to ensure you don't over-stitch or under-stitch, and that theside seam is nice and straight. Sew from the widest point to the point,tapering nicely (so the dart doesn't bunch up).To avoid having to backstitch at the point, you can sew the last centimeterwith a very small stitch. Press the dart's contents upwards.
Lining: Sew the right upper sleeve to the right lower sleeve, right sides together, and close the inner sleeve seam. However, leave an opening of approximately 20 cm on the left sleeve so that the hem can be closed through this opening later. Press the seam allowances open.
Now take the front yoke lining piece and sew it right sides together to the front lining piece. Press the seam allowances open.
Next, we'll work on the back piece. There's a lining pleat at the center back. Fold the back piece over the fold and sew from the edge, about 2 cm down the width of the pleat, and secure it. Press this pleat in one direction all the way to the hem.
The side seams are sewn together right sides together, according to the pattern, and then ironed backwards.
The shoulders are sewn together, right sides together, according to the pattern and then ironed back.
Turn both lining sleeves right side out and insert them into the previously prepared body. Make sure the side seams and notches line up. Press the seam allowances into the sleeve.
The lining can be set aside for now and we'll start with the small parts. The top pocket flap is sewn together with the top pocket flap inside, right sides together (see photo). The bottom pocket flap is sewn together with the bottom pocket flap inside, right sides together.
For curves and corners, trim seam allowances with scissors and then cut or trim. This prevents the corners from becoming too thick when turned, and the seam allowances can be laid flat. It's especially important that the seam isn't cut. Therefore, we recommend sewing just before the point and away from it with a shorter stitch length. This ensures a corner that won't fray as quickly after trimming.
After turning, you should shape the corners with a corner and edge former and then iron them.
Depending on your sewing project, you can topstitch the outer edges, which makes them nice and flat and also secures them.
Collar tabs, shoulder tabs and arm tabs are placed right sides together in the fold and sewn together (see photo).
For curves and corners, trim seam allowances with scissors and then cut or trim. This prevents the corners from becoming too thick when turned, and the seam allowances can be laid flat. It's especially important that the seam isn't cut. Therefore, we recommend sewing just before the point and away from it with a shorter stitch length. This ensures a corner that won't fray as quickly after trimming.
After turning, you should shape the corners with a corner and edge former and then iron them.
Depending on your sewing project, you can topstitch the outer edges, which makes them nice and flat and secures them.
Here you can see all the latches and pocket flaps at a glance.
The pockets will have a so-called pinch pleat. The pattern shows you the direction in which the pleats should be ironed. The pocket is then ironed 1 cm all the way around. If you're using a really thick wool fabric, you can also choose the pocket pattern without the pinch pleat; it's included as an option in the pattern.
The bottom raw edge of the pocket facings is finished. Then, a pocket facing is stitched to a pocket, right sides together, and the facing is folded inward. The seam allowance is then flat-stitched. This method not only facilitates the final pressing but also ensures that the facing, if not topstitched, automatically tucks inward rather than curling up. Only the facing is stitched to the seam allowance, close to the edge. The stitching line is then visible only from the wrong side of the fabric, not from the right side.
The prepared pocket can now be positioned on the markings of the front piece, pinned and stitched in place with the width of the quilting foot.
The prepared pocket flap at the bottom can now be positioned at the markings on the front piece, pinned, and stitched in place with a 1cm seam allowance. However, the seam allowance will then be trimmed by 0.5cm. Then the pocket flap is folded down...
... and stitched through to the width of the quilting foot. This way, the trimmed seam allowance disappears under the quilting stitch. Pay attention to the roll width of the outer pocket flap, otherwise the flap will stick out.
The prepared pocket flap at the top can now be positioned on the markings of the front piece, left to right, pinned and stitched with a 0.7cm auxiliary seam.
The cut yokes: front right and front left are sewn to the respective front pieces, right sides together. The photo shows the left side of the body. Then, press the seam allowances upward.
The seam allowances are stitched to the yoke with the width of the stitching foot.
The back pieces are sewn together at the center back, right sides together. Then iron the seam allowances open.
For the ribbon or hanger on the back of the jacket, the seam allowances are ironed 0.5 cm toward the center, folded, and stitched close to the edge. The ribbon is then ironed flat to form a curve.
The prepared ribbon can now be positioned, right sides together, between the back piece and the yoke at the back along the markings in the pattern, pinned, and stitched in place with a 0.7cm auxiliary seam. The yoke is then sewn to the back piece, right sides together.
The yoke at the back is folded upwards and with it the seam allowances, which are then stitched to the yoke at the width of the stitching foot.
The finished back piece and the prepared front pieces are additionally reinforced with shaping tape: namely the neck holes and armholes.
Close the torso by sewing the side seams of the front and back pieces together, right sides together. Press the seam allowances open.
Close the shoulder seams. Iron the seam allowances open.
The bottom seam of the outer collar is sewn to the neck hole of the front and back pieces.
The facings: front left, back and front right are sewn together, right sides together, and the seam allowances are ironed open.
A hanging strap, made of lining, is pinned between the facing and the collar in the center back.
The bottom seam of the inner collar is sewn to the neck hole of the prepared facing.
Sew the top right facing with the bottom right facing, right sides together. Press the seam allowances open.
The finished facing is sewn to the right front piece, right sides together, and the seam allowances are also ironed apart.
Now take your zipper and the right side of your body. Position the zipper, starting at the notch under the collar, along the raw edge of the facing, right sides together. Sew the zipper down to the bottom. Then pierce the snap fasteners.
The facing is ironed in the fold and placed inwards.
The underlap on the left is turned over on the two short sides, right sides together, and then ironed in the fold.
Position and secure the prepared shoulder straps to the notches in the cut.
The zipper for the left side of the body is attached and secured with a stitching. Then the prepared underlap is stitched through, right sides together.
Finished left side of the body.
Now the facing is sewn to both front edges of the right and left side of the body.
The inner and outer collars are turned together and the upper seam is closed.
The front hem facing is sewn right sides together with the back hem facing and the seam allowances are ironed apart.
Now you can join the finished hem facing to the sewn facing. Make sure to leave a 1.5cm seam allowance to allow for attaching the lining later. The seam allowances are then ironed open.
Now you can stitch the hem facing right sides together to the hem.
The seam allowance is then stitched flat, as far as possible. This method not only simplifies the final ironing but also ensures that the facing, if not topstitched, automatically tucks inward rather than curling up. Only the facing is stitched onto the seam allowance, close to the edge. The stitching line is then visible only from the wrong side of the fabric, not from the right side.
The inner facing on the front right is secured with extra stitching. To do this, sew through the facing in the shadow of the seam.
Before you start working on the sleeves, press the hems according to the notches in the pattern. Sew the upper sleeve and the matching undersleeve together, right sides together.
The upper sleeve at the top is sewn together with the upper sleeve right sides together.
The top of the upper sleeve is folded upward, along with the seam allowances, which are then stitched to the top of the upper sleeve at the width of the stitching foot. The prepared armhole is positioned and secured in the pattern according to the notch. The snap fasteners are pierced according to the markings in the pattern. Be sure to glue a small piece of interfacing under the snap fasteners to prevent them from tearing.
Finally, the inner arm seam is closed. This way, the arm tab is enclosed in the seam.
This is a closed sleeve with arm tabs and snap fasteners. The second snap fastener allows you to tighten the sleeve.
Next, sew the sleeves into your jacket. Make sure the side seams and notches line up. Press the seam allowances into the sleeve. Note that the shoulder tab snap requires a counter button on the shoulder seam. We recommend gluing a piece of interfacing to this area to prevent the seam from coming undone and to make everything a bit more stable.
Before the lining is sewn to the facing, the seam allowances of the collars are placed on top of each other and secured with a stitch on the lower seam allowance.
Now comes the lining. Tuck the lining into your jacket as it will look when sewn in, but with the right side of the lining facing the right side of the fabric.
To make feeding easier for you, we have a video for you here.
Begin by sewing the lining to the front facing. Start and end at the point where you left the 1.5 cm open. Sew all the way around, making sure the notches and shoulder seams match. Press the seam allowances of the facing and lining flat into the lining.
Then sew the lining to the hem facing with a 1 cm seam allowance. Only close the first and last 5 cm of the hem. You'll need the large hem opening for the sleeves.
Then fold the hem facing upwards and sew the seam allowances of the hem and front facings together. This essentially closes the 1.5cm you left open at the beginning.
Next, sew the sleeve lining to the sleeve hem. To prevent it from twisting, we first push the lining properly into the sleeve and pin it to the hem. Only then do we pull the sleeve out and fold the rest.
Then, grab the seam allowance of the lining armhole at shoulder seam height and sew it together with a strip of lining (approx. 3-4 cm long), leaving about 3 cm of slack for the lining. Then sew the strip to the outer fabric in the same position.
The seam allowances under the armpit of the lining and fabric are held together with a bartack.
Now you can close the hem. To do this, leave a gap in the middle so you don't have to turn the entire jacket through the armhole. Sew the remaining hem by reaching through the armhole and pulling out the still open hem to sew it shut.
Now all you have to do is sew the armhole in the lining close to the edge and your jacket is finished.
The prepared collar bar can now be positioned at the markings on the right collar, pinned, and stitched in place with a 1cm seam allowance. However, the seam allowance is then trimmed by 0.5cm. Then the collar bar is folded to the side and stitched through the width of the stitching foot. This way, the trimmed seam allowance disappears under the topstitching. Pay attention to the roll width of the outer collar bar, otherwise the bar will stick out.
Finally, hammer in the remaining snap fasteners.
Your SVEA is ready !
If you're stuck or have any questions, please email us at info@schnittmuster-berlin.de. We'll respond as soon as possible.


 The bottom seam of the outer collar is sewn to the neck hole of the front and back pieces.


 Begin by sewing the lining to the front facing. Start and end at the point where you left the 1.5 cm open. Sew all the way around, making sure the notches and shoulder seams match. Press the seam allowances of the facing and lining flat into the lining.


